
MySQL调用关系
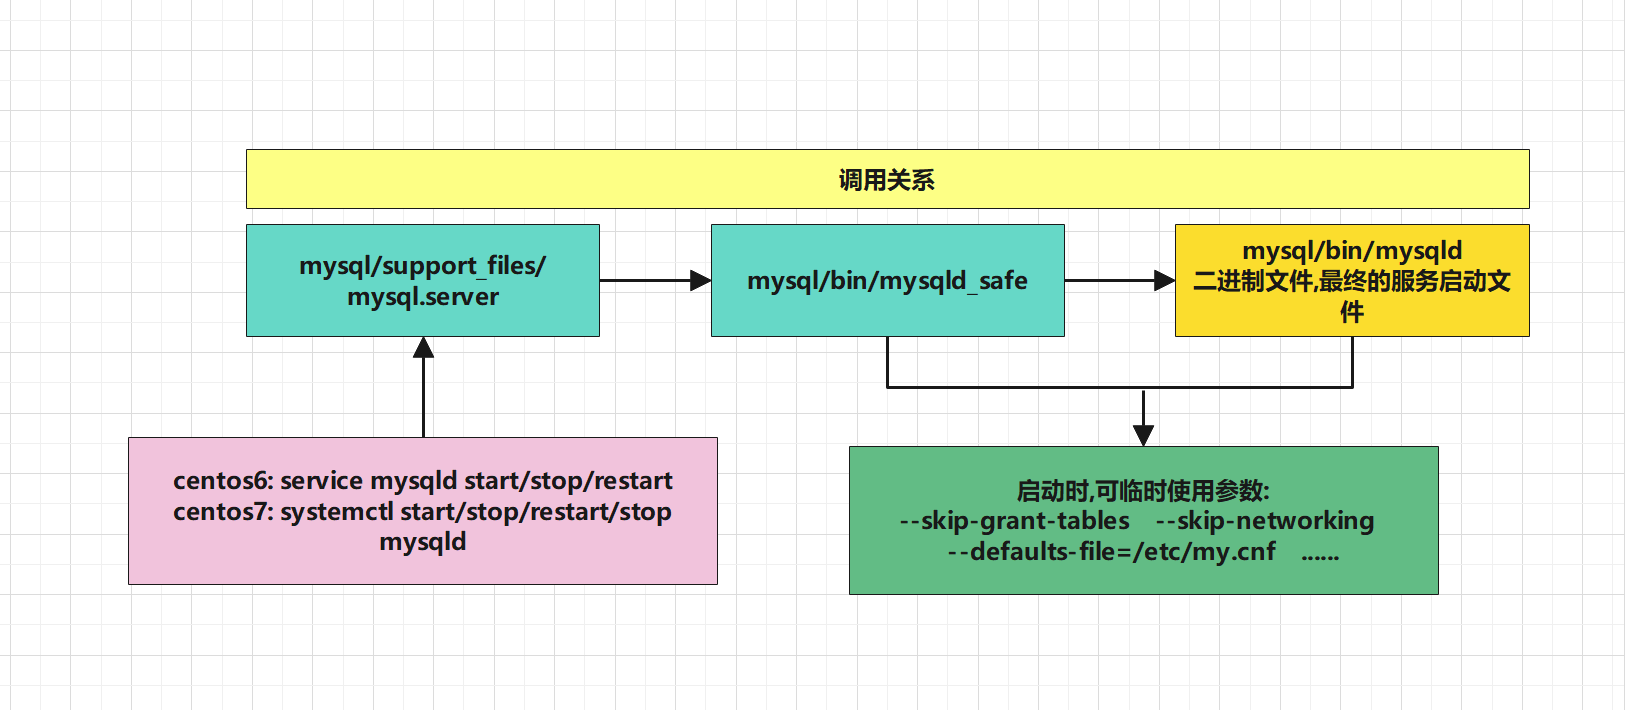
mysql.server & mysqld_safe & mysqld的关系与使用
三种都可以启动mysql
1.mysqld是二进制程序,所有启动方式最后都会调用mysqld.(mysqld_safe和mysql.server中发现脚本中都包含对mysqld的调用)
2.mysqld_safe shell程序,会调用mysqld, 调用mysqld_safe的时候要把-datadir、-pid-file,$other_args这些参数值传入到mysqld_safe 脚本
3.mysql.server shell程序,会调用mysql_safe mysql.server启动,默认使用/etc/my.cnf配置文件信息和其他默认配置,进而调用mysqld_safe
- mysqld_safe 这种方式启动除了会加载MySQL配置(如:/etc/my.cnf)中的[mysqld]和[server]组下的参数内容之外,为了兼容老版本,还会加载[safe_mysqld]组下的内容
- 执行脚本mysqld_safe时,脚本中会去调用mysqld启动mysqld和monitor mysqld两个进程,monitor即监视的意思,这样如果mysql服务挂了,那么mysqld_safe会重新启动mysqld进程
MySQL常用连接命令和用户管理命令
1.mysqladmin创建密码
[root@db02 ~]\# mysqladmin -uroot -p password 'echo'
Enter password:
2.MySQL连接管理
mysql
-u #指定用户
-p #指定密码
-P #指定端口号
-h #指定主机域
-S #指定socket文件
-e #指定说sql语句 查询完后直接跳出
   例如:msyql -uroot -pecho -e "show databases;"
--protocol=name #指定连接方式(不常用)
3.修改密码方式
mysql>set password for root@'localhost' =password('echo');

mysql>set password=PASSWORD('echo'); #只修改当前用户密码


mysqladmin -uroot -p(旧密码) password (新密码)

mysql>update mysql.user set password=PASSWORD('echo') where user='root';
##5.6之前

mysql>grant all on *.* to root@'localhost' identified by 'echo';

mysql>alter user '用户名'@'主机域' identified by '新密码';
mysql>SET PASSWORD FOR '用户名'@'主机域' = '新密码';
##5.7之后
4.误删root用户恢复
#停止数据库
[root@db02 ~]\# /etc/init.d/mysqld stop
Shutting down MySQL.. SUCCESS!
#使用msyqld_safe启动  --skip-grant-tables 跳过授权表  -skip-networking 跳过网络(只允许本地连接)
 mysqld_safe --skip-grant-tables --skip-networking &
#方法1 (复杂,不推荐)
mysql> insert into mysql.user values ('localhost','root',PASSWORD('echo'),'Y','Y','Y','Y','Y','Y','Y','Y','Y','Y','Y','Y','Y','Y','Y','Y','Y','Y','Y','Y','Y','Y','Y','Y','Y','Y','Y','Y','Y','','','','',0,0,0,0,'mysql_native_password','','N');
#退出mysqld_safe模式
mysqladmin shutdown
# 正常启动mysqld
/etc/init.d/mysqld

#方法2(推荐)
mysql> flush privileges;
Query OK, 0 rows affected (0.00 sec)
mysql> grant all on *.* to root@'localhost' identified by 'echo' with grant option;
Query OK, 0 rows affected (0.00 sec)
#ps 超级用户要加上 with grant option
5.忘记root密码
#停止mysql服务
[root@db05 ~]\# /etc/init.d/mysqld stop
#跳过授权表和网络启动mysql
[root@db05 ~]\# mysqld_safe --skip-grant-tables --skip--networking
#更改root密码
方式1:
mysql> update mysql.user set password=PASSWORD('echo') where user='root';
#PS: MySQL5.7.90后已经弃用password字段和password函数可使用跳过授权表模式启动
方式2:
mysql> flush privileges;
mysql> alter user root@'localhost' identified by 'echo';
方式3:
mysql> UPDATE `user` SET authentication_string='' WHERE `User`='root' AND Host='localhost';#重置为空密码
方式4:
mysql> SET PASSWORD FOR '用户名'@'主机域' = '新密码';
6.MySQL用户权限管理
show grants for 用户名@'主机域'     # 查看用户信息
show grants                        # 查看当前用户信息
create user 用户名@'主机域'identified by '密码'; #创建用户和密码

mysql8 不可以使用grant 创建密码!!!

grant all(权限) on `库名`.`表名` to 用户名@'主机域' identified by '密码'
	#创建用户和密码 all privileges与all 作用一样
	#全部授权: *.*
	#单库授权: mysql.*
	#单库单表授权:mysql.user
	#脱敏:脱离敏感信息
 grant select(所要授权的字段名) on `库名`.`表名` to 用户名@'主机域' identified by '密码'  #单列级别授权:

drop user 用户名@'主机域'   #删除用户(逻辑删除)

delete from mysql.user where host='localhost' and user='hanjy';  #删除用户(物理删除)不推荐使用

update user set host='127.0.0.1' where user=hanjy and hostname='localhost'; #修改用户主机域为127.0.0.1

revoke update(权限) on hanjy.*(库名.表名) from hanjy@'%'(收回哪个用户的权限); #收回指定用户的指定权限

revoke all privileges on hanjy.* from hanjy@'%'; #收回指定用户的所有权限
7.mysql_show
select database(); #查看当前在哪个库下
show variables like 'character%'; #查看数据库编码格式
show create table mysql.user; #查看创建表语句的sql信息
show create database mysql; #查看到创建库语句的SQL信息
show character set; #查看character值
status 或者 \s    #查看数据库字符集等
show tables  hanjy; #不进入指定库,直接查有哪些表
show privileges #查看mysql中的所有权限

评论区